Completion requirements
Basic apparel constructions
Table of contents
2. Grid of the construction [edit]
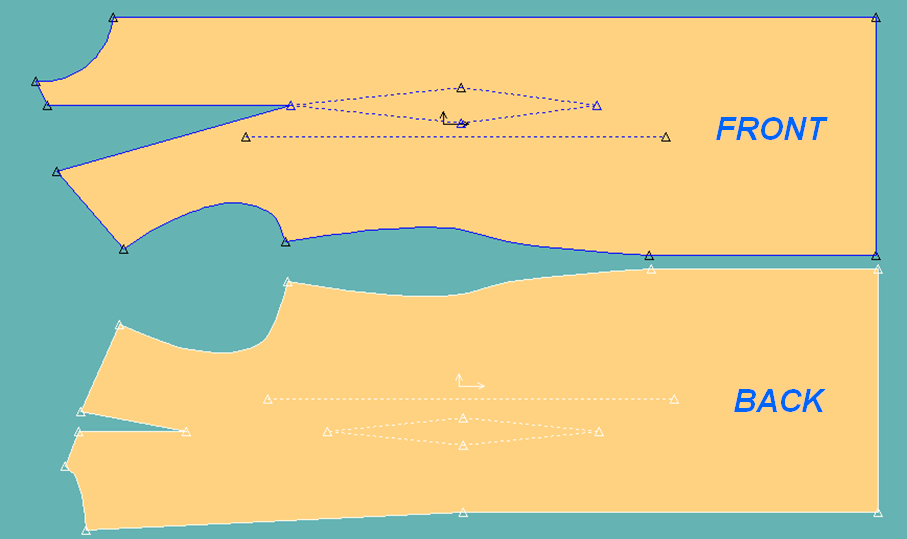
5. Front
shoulder dart area
[edit]
7. Waist darts and side seam area [edit]
Algorithms for pattern making of basic apparel constructions.
Ladies’ dress with one-piece sleeve. Input anthropocentric body measurements. Variable
values of the technological additions on the basic construction
lines (ease etc.). Preliminary calculations of structural
dimensions of the parts drawings. Algorithms for pattern making of the
construction: grid of the construction, neckline, shoulder area, front shoulder dart, armhole curve. Verifying of the construction. Measurements, revision and
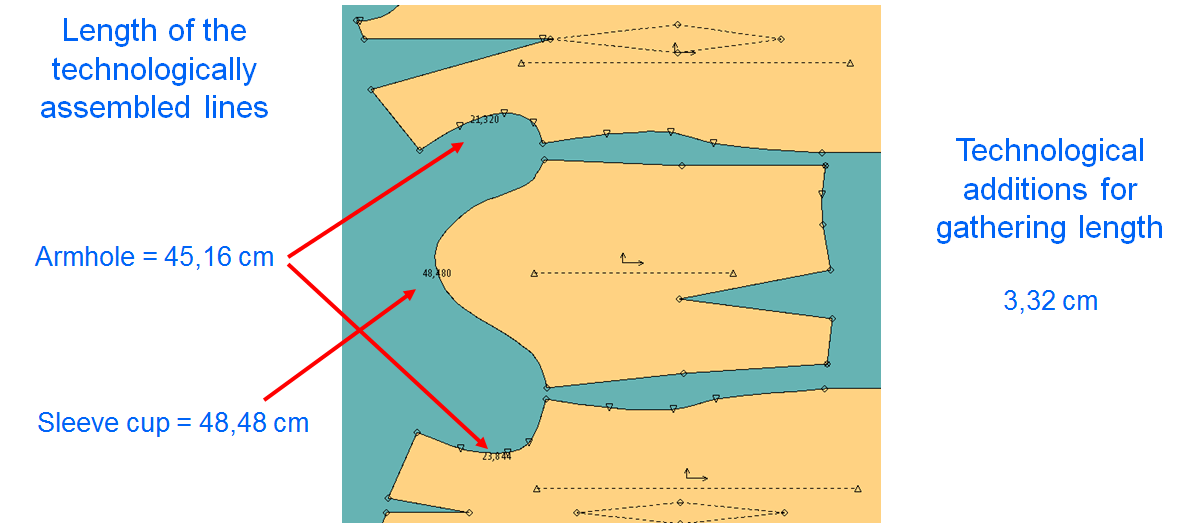
alterations. Length of the technologically assembled lines: armhole/sleeve cup
curve. Technological additions for gathering length
General information [edit]
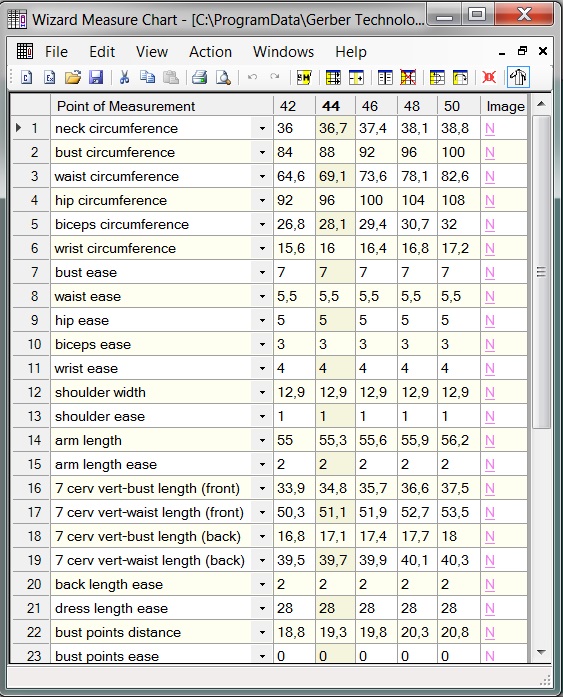
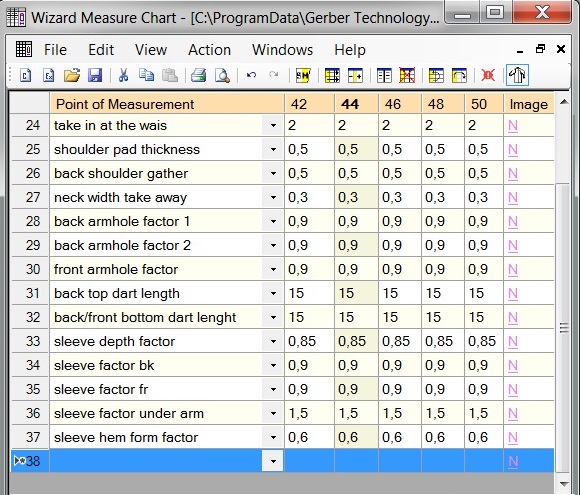
Measure
chart
Body
measurements according to the Methodology for Pattern Making of TU-Sofia and variable values of the technological additions:
ease,
seam allowance.
Preliminary calculations of structural dimensions for ladies’ dress in semi-fitted silhouette are in the file Calculation EN.xls
Algorithm for pattern making of the construction (Pattern Making Process)
Grid of the construction [edit]
Create/ Piece/ Rectangle
Input the name of the piece
- Create/ Line/ Offset Even
TIP: The value is set with a minus sign so that the line is inside the part
- Create/ Line/ Offset Even
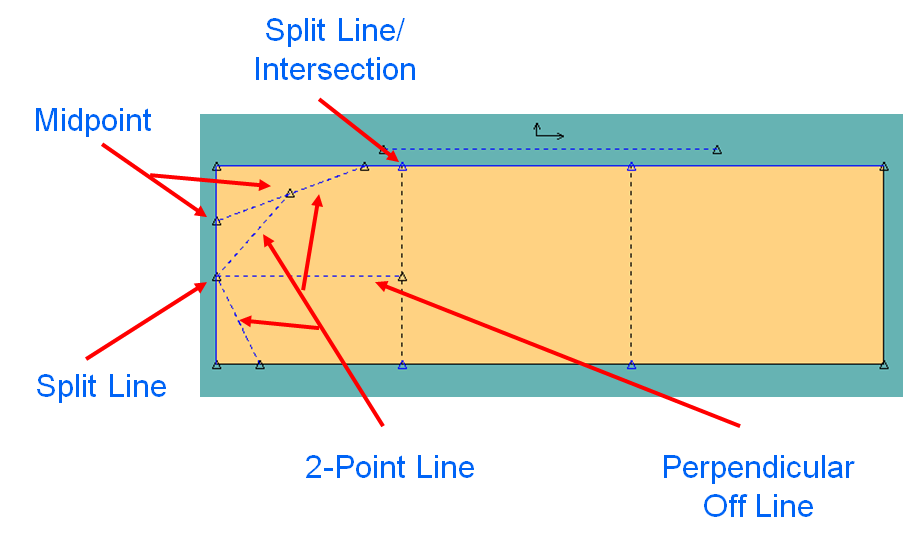
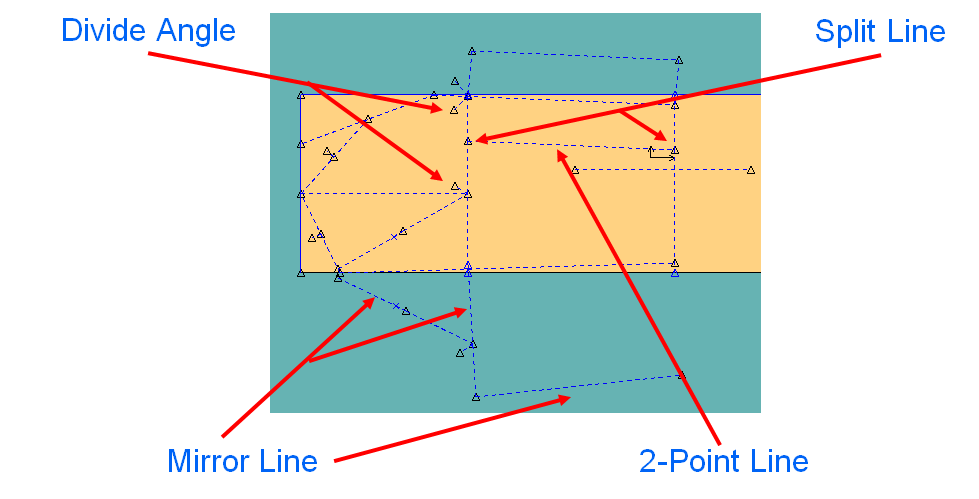
Modify/ Line Actions/ Split
Create/ Line/ 2-Pt Line/2-Pt
Create/ Line/ 2-Pt Line/Perp Off Ln
- Modify/ Line Actions/ Split
Split the chest line with the width of the back 14
Split the chest line with the width of the armpit area 15
Verify/ Measure/ Line Length
Draw a parallel line for the front taking into account the front balance height 16-17
- Draw two perpendicular lines 14-18, 15-16
- Draw a line for the side seam 19-20
- Draw the shoulder blades line as a parallel line 21-22
- Clip the line by selecting the line on side to keep 21-23
- Draw the perpendicular lines for the location of the darts in the front and in the back piece 24-25, 24-26, 27-28, 27-29
- Assign the rule table to set the size of the piece
- Save the piece

Neckline area [edit]
- Split the line with the width of the neckline 1-30
- Draw a perpendicular line with length equal to the height of the neckline 30-31
- Draw an auxiliary bisector 30-32
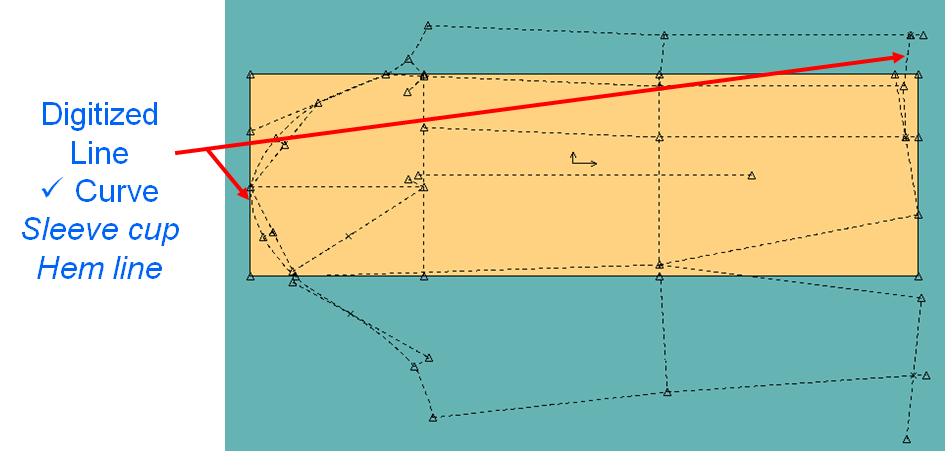
- Create the neckline as a digitized curve line between three points1,32,31
- TIP: Right click after selecting the first point and choosing the Curve option
- Replace the perimeter lines in the area of the armhole with a sequence of internal lines 18,14,15,16,17,4
- Combine the lines in the front middle 17-4, 4-3
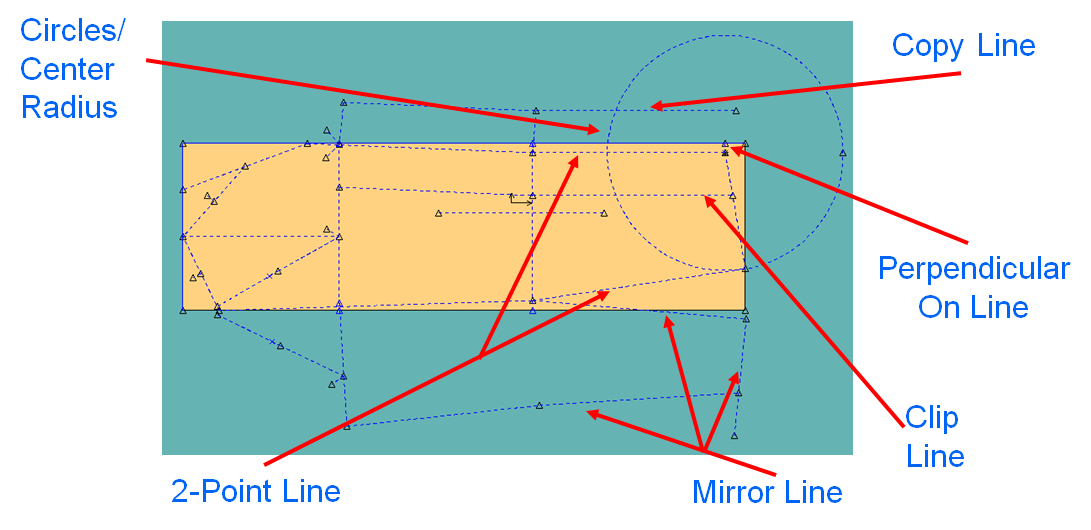
- Create two auxiliary circles for defining the center of the front neckline A1, C1
- Draw the front neckline A2
- Split the line zero point five centimeters upwards
- Delete the auxiliary lines A1, C1
- Combine the parts of the front neckline 33-34, 33-36

Shoulder area [edit]
Create the back shoulder line with closed dart 37-38
Draw an auxiliary bisector for the shape of the shoulder line 37-39
Extend the line for the location of the darts to intersect the shoulder line 41-29-40
Clip the line by selecting the line on side to keep
Create the part of the shoulder line 31-39-40
Measure the length of the line
Split the line to make the shoulder dart apex 41
Create the second dart leg of the shoulder dart
taking into account the dart width 41-42
Measure the length of the first dart leg 41-40
Extend the second dart leg to the same length 41-42-43
Create the shoulder line with the open dart 43-44
Extend the line to the calculated length 43-44-45
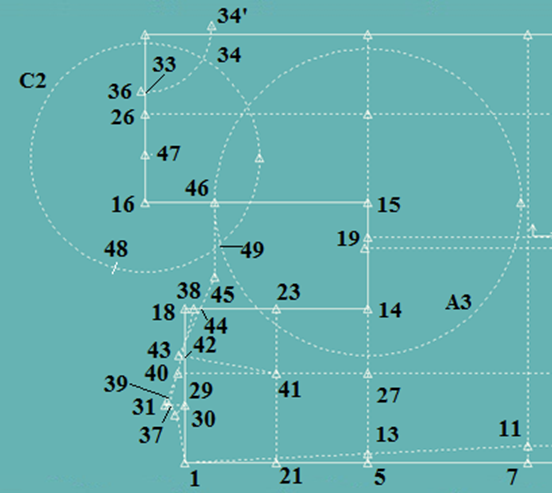
Draw a perpendicular line for the depth of the armhole 45-46
Measure the distance 15-46
Draw a circle with radius equal to this value A3
Draw a second circle with radius equal to the front shoulder width C2
Create the shoulder line as a line between two points 47-49
Front
shoulder dart area
[edit]
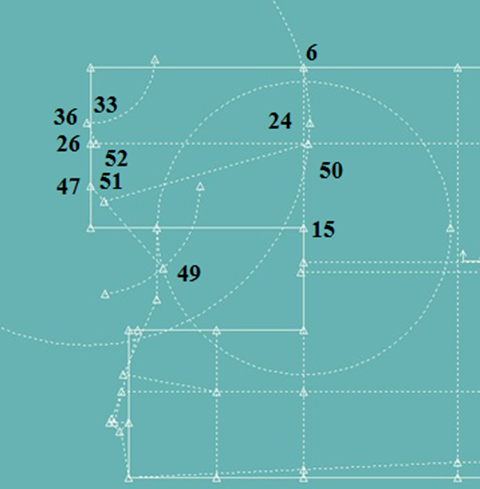
Determination of the actual center of the chest and construction of the front shoulder dart
Draw a circle to define the real center of the chest C4
Split the line at the intersection point to mark the real center of the chest 50
Delete the part of the line 24-50
Extend the line with a snap to geometry option 26-50
Measure the distance between the base of the neck and the location of the darts 26-33
Create the first leg of the shoulder dart taking into account this value 51-50
Measure the length of the first dart leg
Draw the second part of the shoulder by adjusting the second dart leg to the same length 52-36
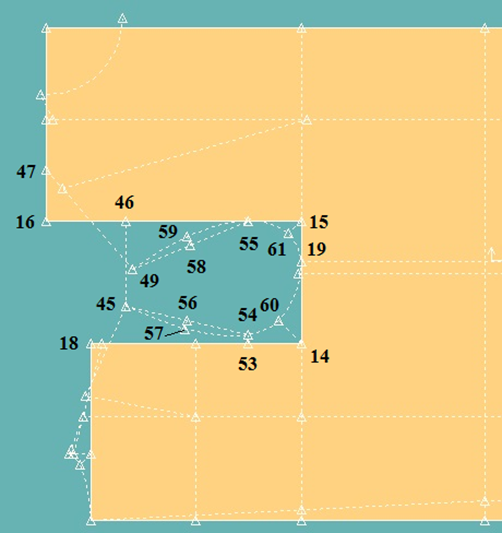
Armhole curve area [edit]
Draw a perpendicular line with the length of 1 cm 53-54
Mark a point on the front part as an intersection point 55
Create a line between two points for the back 45-54 and for the front part 49-55
Draw a perpendicular line from the middle of the line for the back 56-57 and for the front part 58-59
Draw a bisector in the armpit area for the back 14-60 and for the front part 15-61
Create the armhole curve as a digitized curve line indicating the nodes in sequence 45, 57, 54, 60, 19, 61, 55, 59, 49
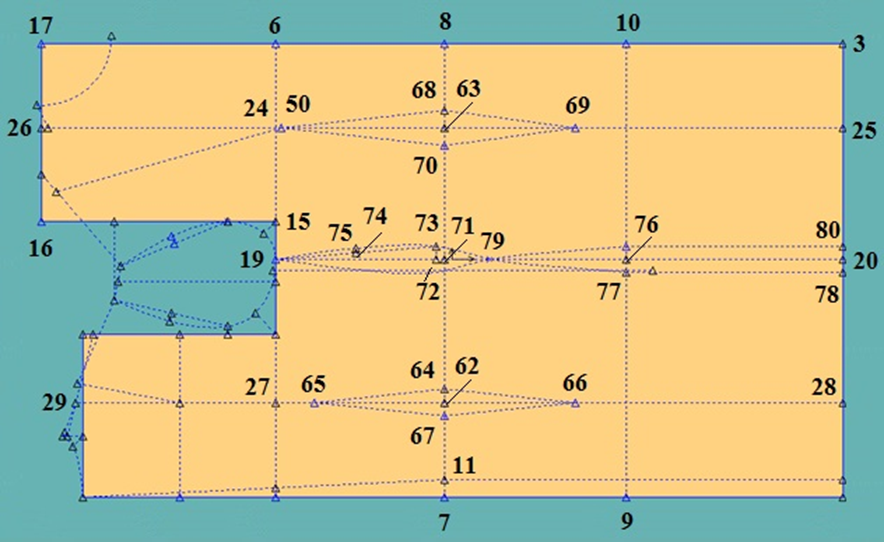
Waist darts and side seam area [edit]
Waist darts creation and construction of the side seams
Output pieces [edit]
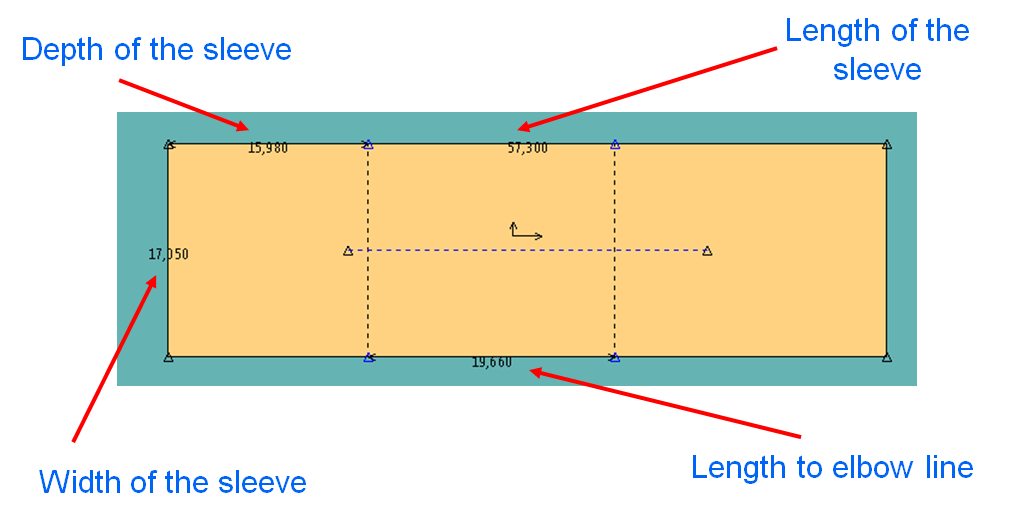
Sleeve [edit]
Grid of
the construction
Auxiliary construction point and lines
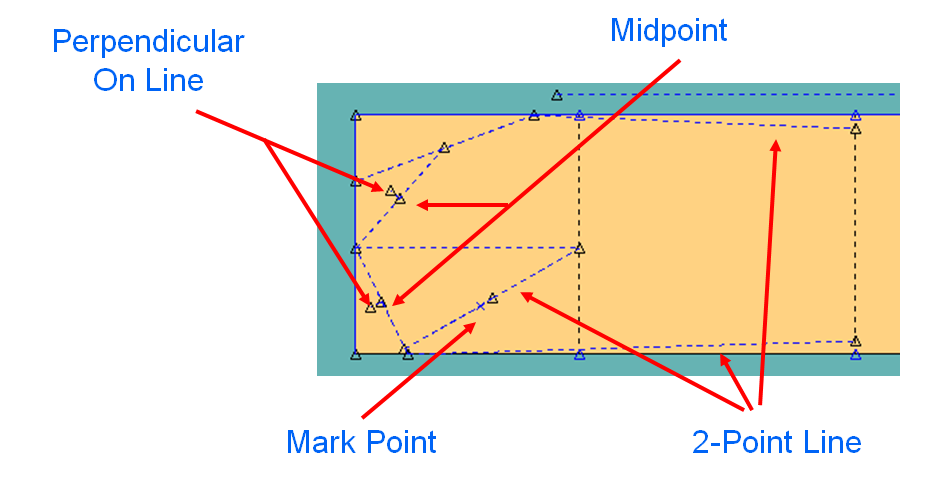
Sleeve cup
Mirror areas
Sleeve hem and elbow dart
Draw contour lines
Trace the pieces from the construction
Verify the construction [edit]
Revision and alterations
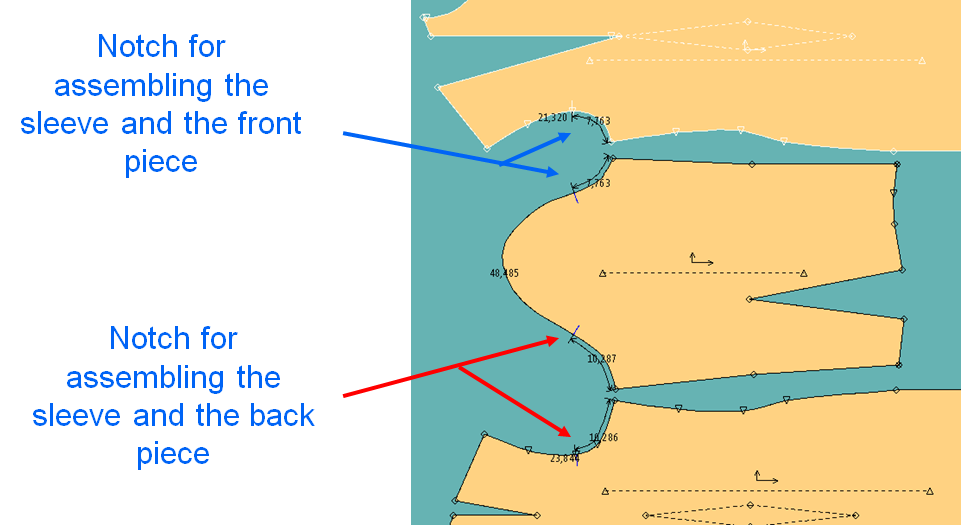
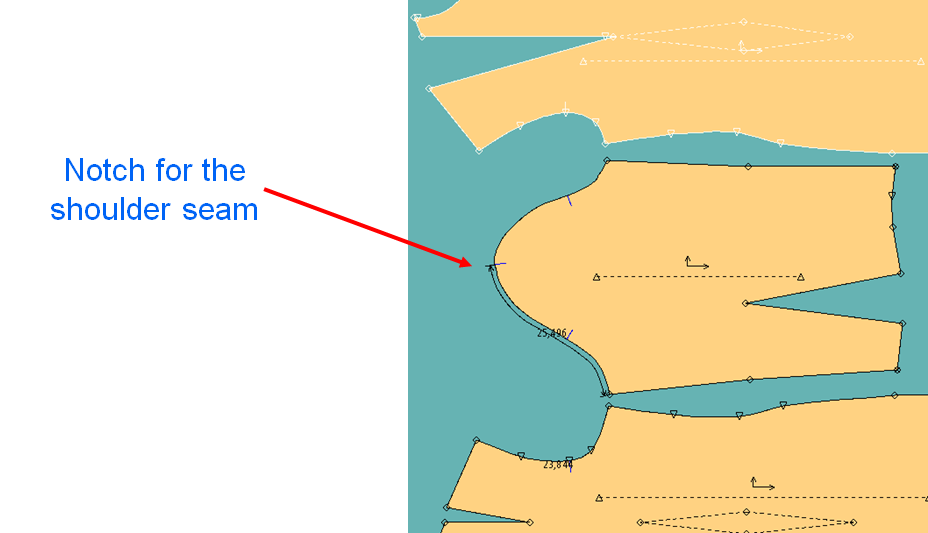
Set notches for assembly of the pieces